

NAVIGATE HERE
Site Kit by Google
This post is actually connected to the post, The Best Way to Get Approved for Google Adsense, that I published previously. This is the one of the steps involve on the said tutorial, which is How to Set Up Site Kit Plugin for Google Adsense.
At first, I just installed Google Site Kit because of Adsense, but then, I saw the convenience of having all my Google Tools in one place. I don’t need to go out of WordPress dashboard to check my Analytics, for example, because it is already within my back office.
In this post I talk about :
- What is Google Site Kit Plugin and What Does Site Kit Do
- Why Do You Need Site Kit Plugin
- Who Needs Google Site Kit Plugin
- How to Set Up Google Site Kit
Let’s start shall we?
I. What is Site Kit Plugin and What does Site Kit do

This is the description of Google Site Kit according to WordPress :
” Site Kit is the official WordPress plugin from Google for insights about how people find and use your site. Site Kit is the one-stop-solution to deploy, manage, and get insights from critical Goolge tools to make the site successful on the web. It provides authoritative, up-to-date insights from multiple Google products directly on the WordPress dashboard for easy access, all for free.”
WordPress
In other words, Site Kit is a plugin from Google where you can connect all your Google tools, such as Google Analytics, Google Search Console, Google Adsense, Google PageSpeed, Optimize, and Tag Manager. Insights all in one place within your WordPress dashboard.
So you won’t need to visit website after website just to access your site performance.
II. Why do you need Google Site Kit Plugin
Well, the answer is simple. If you’re a website owner, you definitely check your website’s insights on a regular basis, right? So to have those insights all in one place will be real convenience.
Personally, I didn’t know about Site Kit until I applied for Google Adsense and it made saved a lot of time inserting those Adsense codes on my blog.
Plus, now that I have all the Google Tools I need right at my WordPress Dashboard, it’s easier to monitor my blog’s performance.
Read : “How I Got Approved for Google Adsense in Less Than 24 Hours!”
III. Who is Site Kit Plugin for

Basically Google Site Kit is for anyone who has a WordPress website! From small businesses to newbie and experienced users.
Google Site Kite plugin is for you if you are :
A website owner / a Blogger
As I mentioned above, if you are a site owner or a blogger, you would want to see how user find and use your website. You need to know your website’s insights to help you maintain, build, and grow your online presence.
And that’s what Google Site Kit can help you with. Because it gives you easy-to-understand metrics and suggest actionable tasks right within your WordPress dashboard.
A Website Developer
If you are a website developer who creates and maintain WordPress website for a client, then Google Site Kit is just for you.
Site Kit is the one-stop solution to deploy, manage, and get insights from critical Google tools to make the site successful on the web.
CHECK OUT MY RECENT POSTS :
- How to Write Your First Blog Post: Beginners’ Guide

- Best 7 Tips on How to Pick a Domain Name

- 200+ Blog Post Ideas for New Bloggers to Skyrocket Consistency

III. What Google products can you connect with Site Kit?
Analytics
A site owner uses Google Analytics to track his /her website activity like traffic, session duration, pages per session, bounce rate, etc.
It gives you report on how people is actually using your site.
Search Console
If Analytics gives you insights on your site’s traffic, Search Console on the other hand helps you improve your ranking on search engine by helping you monitor, maintain, and troubleshoot your site’s performance.
Search Console let you know if there are bugs to be fixed and errors that hinder your site from indexing. It is also a great tool to know in which keyword/s your site is actually ranking.
Adsense
Adsense is an advertising platform / network that helps a website owner to get monetized by placing ads on their website.
PageSpeed Insight
PageSpeed Insights lets you know how you can improve your performance even more by checking your website’s loading speed on desktop and mobile devices.
Tag Manager
Google Tag Manager is another free tool from Google that allows you to manage and deploy marketing tags or various scripts on a website or mobile application without editing the source code.
Optimize
Google optimized is an A/B testing tool that helps online marketers and website owners to improve conversion rates by testing different website contents.
IV. How to Use Google Site Kit
How to set up Google Site Kit In order for you to be able to use Site Kit, you have to log in your WordPress, and from your dashboard, here’s what to do :
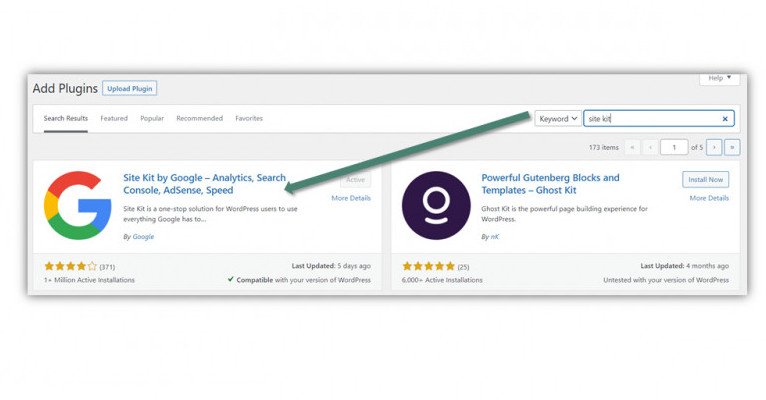
Step 1. Installing Google Site Kit plugin
From your dashboard, go to plugins >> add new. And search for “Site Kit”. Click Install now then Activate.
Step 2. Once it’s activated, you’ll be shown this message.

Step 3. Verify your website ownership
Once you click start setup, you will then be taken to a new screen where you have to verify that your website ownership as seen in the image below :
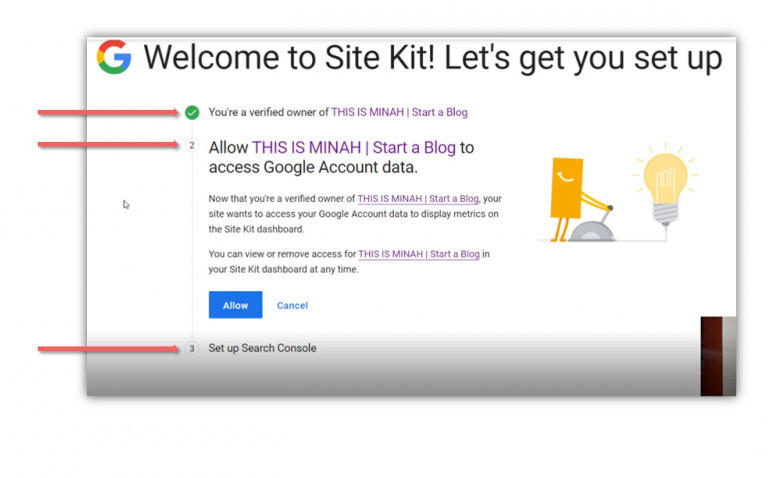
Please note that the screen or the image I provided may look different from yours depending on some situations such as, if you’re not logged in to your Gmail account upon setting up Site Kit or it can also be because of Google updates.
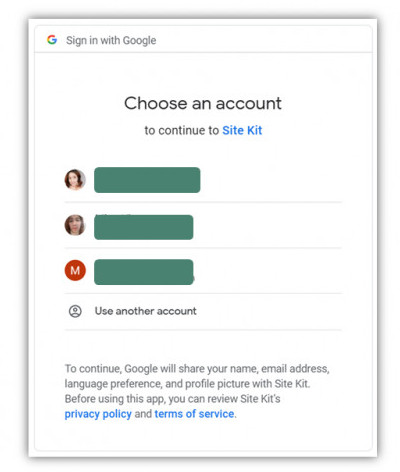
Step 3.1 Sign in with Google :

Step 3.2 Choose Google account to connect with Site Kit
Click “sign in with Google” and it will bring you to another screen where you’ll be asked to choose the right Gmail address.
This Gmail address should be the one that you used on setting up your Analytics or Search Console for that matter.
Step 4. Give Site Kit permission to access your Google account
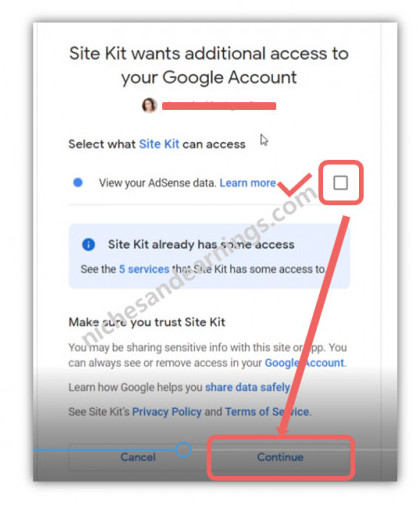
Step 5. You then click Continue or Allow (in some cases).
Then Site Kit will ask permission to connect your other Google services such as Analytics, Console etc. Click Allow, you’ll then proceed to the next step.
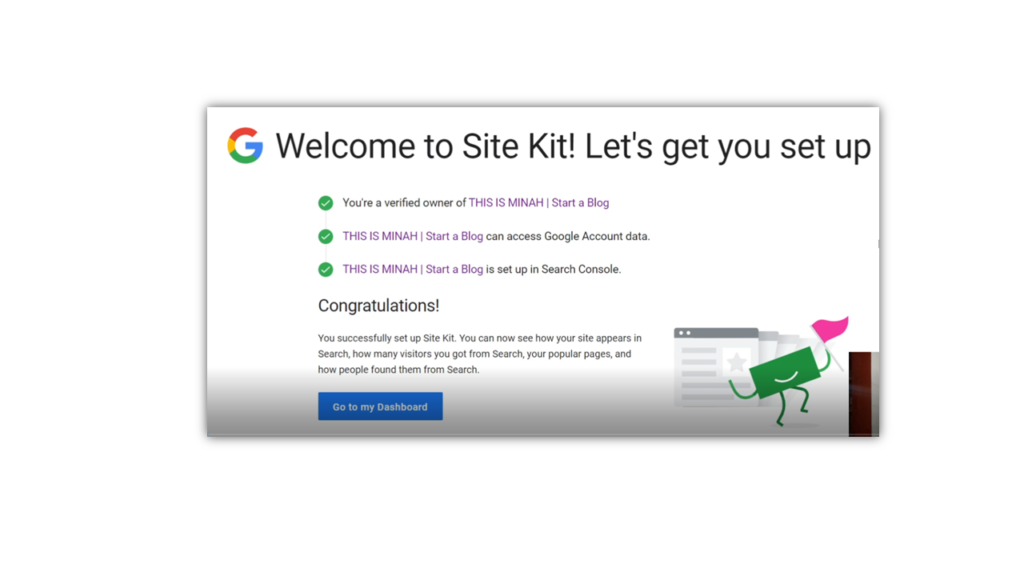
Step 6. Google Site Kit set up complete
The above image is what you will see upon completing all the steps. It means that :
- You’re the verified owner of your website and that your domain is already set up on Google Search Console.
- And Site Kit can access your Google account data and Search Console data. However, to make Site Kit work better for you, you still have to allow Site Kit to be connected with other Google products/services you may want to link, like Google Analytics or Google Adsense for example.
So when you go to your dashboard, your screen will look like this :
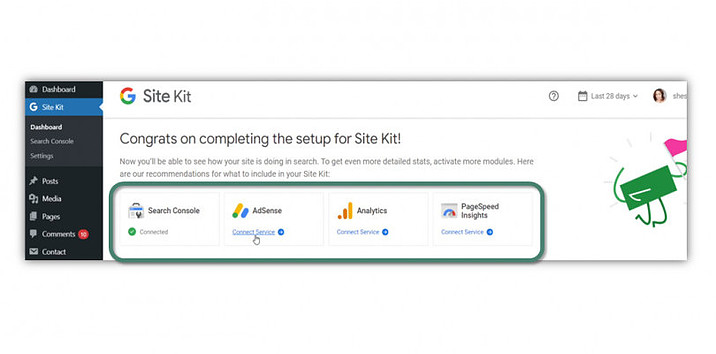
Step 7. Check the main Google Tools that you would need connect your site to.
As you can see from the image above, Site Kit has only access to Search Console, if you look closely, there’s green check mark and says connected. Because so far, that’s the only that’s given access to.
Step 8. How to connect Site Kit to Google Tools
Since I got to know about Site Kit when I applied for Google Adsense, I will then show you the steps on how I connected Adsense to my site through Site Kit plugin as an example.
And I am not going through each of the product because the process or steps will be the same. Just make sure about these 3 things in connecting any Google Tools in Site Kit :
- You must be logged in to the same Gmail Address that you used for your Analytics and your Search Console.
- You must have already configured the settings of the Google Tools that you wish to connect. In this case, make sure that already have your Google Adsense setup. Otherwise, there will be an additional step.
- All you have to do is just to follow the prompt, because the instructions are straight forward.
Step 9. How to connect Google Adsense to Site Kit
Refer to the image below :

As you can see from the image above, these are the main Google tools that you can connect with Site Kit if you wish to. In this post, I’ll focus on Adsense.
A. On Adsense Tab, as shown above, click “connect service”
Before connecting the Google Adsense service, make sure that you already create an account. Read this post to help you create one :
‘The Best Way to Get Approved for Google Adsense”
Once you have your Google Adsense account ready, go ahead and click “connect service” under the Adsense tab. Once you’re done, you’ll proceed to next step.
B. Choose Gmail account
Again, you have to choose the Gmail where you have all the data for your website. I mean the one that you have used to create you Analytics, Search Console, and Adsense account. And make sure that you are logged in.

C. Give Site Kit access to your Google Account
After you choose the right Gmail address, Site Kit will ask permission to access your Google Account. As shown in the image below :

From the image above, you then check the square box, which means your allowing Site Kit to view your Adsense data, then, you should click continue.
D. Add site to Adsense
The next thing that will come up on your screen after hitting continue, is this :

After that, hit “add site to Adsense” button.
E. Enter your website URL
You then be forwarded and prompted to add your website URL, you do so.
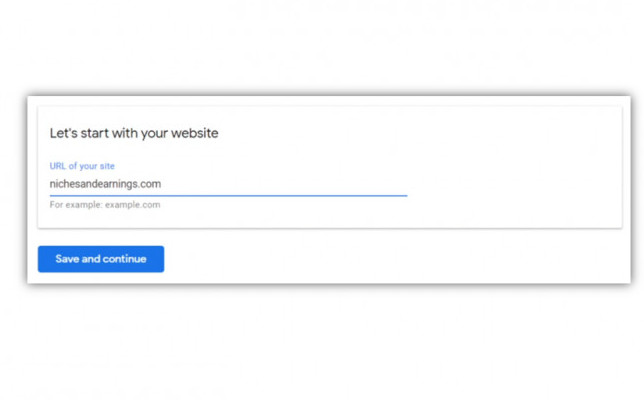
So, when you are in this step, click “save and continue“.
F. Google Adsense Service is now connected

If you’d like to see what Google Tools / Services connected in your Site Kit, you can always check it by going to settings within your dashboard.
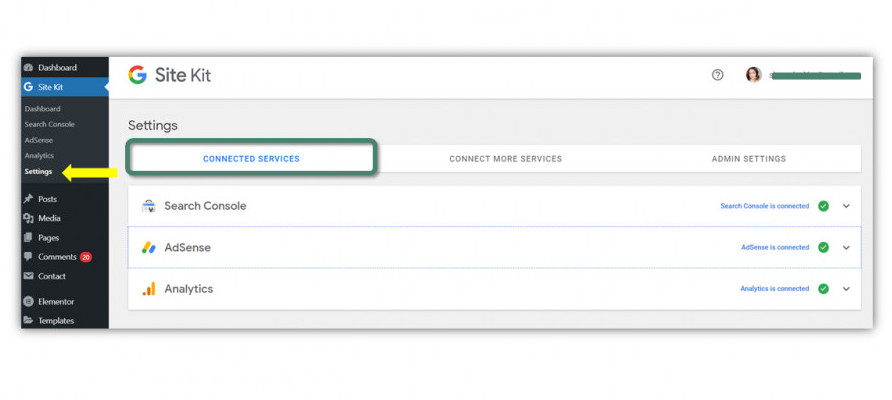
Likewise, if you wish connect more services, you can do it in the settings as well.

PIN ME!

Recap
For recap, again, for those of you who like to skim, this is what I discussed in this post :
“How to Use Google Site Kit Plugin”
- Install and activate Site Kit plugin.
- Click “Set Up“.
- Verify your website ownership.
- Sign in with Google
- Choose Google account to connect with Site Kit
- Give Site Kit permission to access your account.
- Click “continue“.
- You successfully installed Google Site Kit plugin.
How to Connect Google Adsense to Site Kit
- On Adsense tab, click “connect service“.
- Choose Gmail account.
- Give Site Kit access to your Google account.
- Add site to Adsense.
- Enter your website URL.
- Google Adsense service is now connected.
Wrapping Up
How to set up Google Site Kit and connecting it to different Google services is way easier than I thought. It is simple and straight forward that even a beginner can do it with a breeze.
It is a proof that to have and run a business online, a blog for example is so much is almost an effortless task these days. I just can’t imagine how would it be 15 – 20 years ago!
Overall, I see Google Site plugin is worth installing if you are a small business owner, marketing professional, or someone who runs a personal blog.
Are you going to try and set up Google Site Kit plugin for your website? Let me know in the comments below.
See you on my next post!

Please don’t forget to share! Sharing button’s here:

Hi there! This is Minah, the blogger behind of Niches and Earnings | Start A Blog.
I created this website to be a place where you can get information on how you can start your blog. Also tips on blogging, how to use social media for your blog and make money in the cofort of your home.
Let’s connect on social media too!
Great article, Minah! I love how you stress the importance of having the Site Kit plugin for Google AdSense. Site Kit is our one-stop-shop to monitor our website traffic, the geographical information of our website visitors (country, time, etc.), the number of ad clicks we’ve procured, as well as how much money we’ve made from our Google Ads. I definitely check my statistics on a daily basis (at least every other day), and as a website owner, you always want to stay ahead of the curve (determine which posts and which types of ads tend to attract the largest audiences, clicks and conversions). Great read! I’ll definitely spread the word. Yah (God) bless you!
Glad to here you like post!
And thanks for elaborating Google Site Kit plugin.
Are you using it too?
You are right. Running and maintaining a business online now must be a breeze compared to what it was 10 years ago and more.
This plug-in seems extremely useful. Currently, I am having to log into Google console and then Google analytics separately.
The optimize tool is something I haven’t tried yet, and Adsense is something you have got me thinking about…….
I’ll check it out…. seems like a no-brainer really!
Thanks for the information.
Hey Minah, I like your post and website in general. I didn’t know there was a Google Site Kit even though I use both Analytics and Google Console Search. Installing Google Kit is too easy and I will definitely follow your instructions. I’m just wondering if I can track everything via Google Kit without going to Analytics or it’s just a kind of supplement.
I intend to use Google Adsense and I was just told not to use it for newborn sites.
I wonder what is your opinion?
All the best,
Danijela
I’m glad I found your article as I didn’t know about the Google Site Kit plugin. I’m amazed at how much it can do and how easy it will be to check stats on Google accounts. I already have Adense code on my site will definitely install it and connect to Google console. Thanks for sharing:)
You are right, with so many tools and available information ready, its really much easier now to start blogging. Or any other things for the matter!
I have installed the site kit before but I guess I have not fully utilised it. Your article gave me a good refresher course and now I understand the plugin better. It is indeed powerful.
Thanks for sharing!
Cheers,
SAM
I’m happy to know that you find this post helpful.
Hi Minah,
Google Site Kit is indeed a very convenient tool to check your post’s performance. Due to your sharing in another post, I installed it on my blog that leads me to discover how powerful it is. It not only share key indicators for your blog post but also saves you tons of time jumping from GA to search console to get the same information. 🙂
Cheers,
Matt